Subtitles or captions have long been useful for the hearing impaired and fans of foreign language cinema but log on to social media and you’ll soon see they’re now everywhere. In this post you’ll learn why you should be adding video subtitles (especially on social media), and how to do it.
Subtitles, if you’re unsure, are the text that is displayed at the bottom of a video which allows viewers to read the dialogue in a video. They’re useful for viewers because they allow them to understand a video even when they can’t hear the sound. This is a common problem for people watching videos on a mobile device or while multitasking.
There are a few ways you can add video subtitles and they have their own advantages and disadvantages.
Sidecar Caption Files
Creating a dedicated caption file means creating a separate text document that is added to a video once it has been uploaded. An ‘.srt’ file is a common and simple way to do this, but there are other similar files that perform the same function. The file type that you use will be determined by the software you have available and the file type that your destination platform (Facebook, YouTube, Vimeo, etc) will accept.
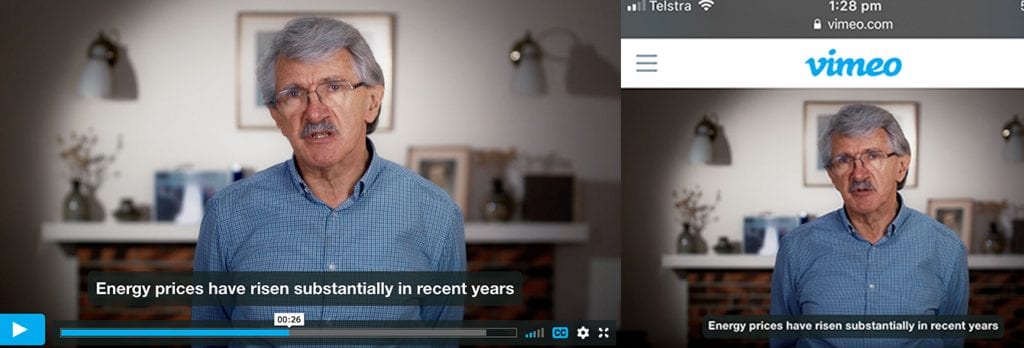
A sidecar file is usually the best option because subtitles will be displayed in the most readable way possible, depending on the screen size. If people view your video on a mobile then they won’t be too small but if they’re watching on a computer then they won’t be so large that they obscure the image. In the image below the subtitles are scaled so they don’t obscure the play bar.

The video hosting platform will also decide on the best way to display subtitles in terms of font and layout. While this takes away some control, it does ensure that letters will never be too close together and inappropriate fonts and colours cannot be used.
Adding additional languages is also an option. If your business has both an English and Mandarin speaking audience then viewers can choose their preferred language. This requires creating a mandarin subtitle file in addition to the English subtitle file.
A hidden benefit to using a sidecar file is that Google can read these, and you may find an SEO boost after adding them. By this I mean, if somebody is searching for something on Google then they will be more likely to come across your video because Google has read the content of your videos, and knows whether it is relevant to that search.
Burnt in subtitles
Sometimes the simplest way to add video subtitles is to burn them into the picture in the editing stage. This means that they are part of the video image and cannot be turned on or off. You won’t ever need to worry about sidecar file compatibility. The video below has burnt in subtitles, you can learn more about the project here.
The advantage to this method is that you can design them to fit in with your company’s brand identity because you can set the font and size yourself. Also, if you’re in a situation where you need the subtitles displayed but don’t have control of the platform (like at a conference) then burnt in subtitles are guaranteed to work.
One drawback for burning in subtitles is that they cannot be turned off. Some people prefer to watch videos without subtitles and burning them in will give them no choice. It also means text will always be the same size in comparison to the screen you view the video on. Text that looks great on a computer screen will most likely be far too small for a mobile device and vice versa.
How to Create a .srt Sidecar File

The great thing about .srt files is that they are widely accepted and can also be created without expensive software. You can use Notepad (PC) or TextEdit (Mac).
To create the file you need to add in the text that should appear and the time that it should appear. It’s a bit like computer coding in that the formatting you use needs to be exact.
- Open your text edit or notepad app and start with the number of the subtitle (starting at 0)
- Add a line break and then specify the time you would like to display the words. For example, using 00:00:01.000 –> 00:00:05.000 will display your first subtitle from the first second of the video to the 5 second mark.
- Add a line break and then add the text you want to display, for example ‘Welcome to my video about subtitles’
- Once saved, you need to change the extention on the file to ‘srt’. For example Video.txt needs to be renamed to Video.srt by selecting the file, pressing enter and then typing .srt at the end.
As a complete example, the below would display ‘Welcome to my video about subtitles’ from 1 second to 5 seconds and then ‘Thankyou for watching’ from 5 seconds to 10 seconds :
0
00:00:01.000 –> 00:00:05.000
Welcome to my video about subtitles
1
00:00:05.000 –> 00:00:10.000
Thankyou for watching
Uploading a .srt to Youtube and Facebook
To upload your .srt file to either Facebook or Youtube, you need to start by uploading your video first.
- Once uploaded, click on the ‘post’ button and then click ‘edit this video’.
- Now simply select your .srt file with the ‘choose file’ button and save the video.
YouTube
- Head to ‘My Channel’ and then ‘Video Manager’
- Next to the video you’ll see an ‘edit’ dropdown menu, scroll down to ‘Subtitles and CC’.
- Click ‘Add new subtitles or CC’ and then select ‘subtitle file’ instead of ‘Transcript’.
- Publish your video.
The process for uploading subtitles is quite similar for most platforms. The only major social media channel that doesn’t allow caption files is Instagram, the burnt-in method is your only option.
If you’re interested in creating a social media video with video captions, get in touch with me today.

Ryan Spanger is one of Melbourne’s most respected and sought-after video production professionals. Ryan founded Dream Engine in 2002, and specialises in helping medium to large corporates, government departments, and the non-profit sector to connect with their audience more effectively by using video.

